For those of you new to digital scrapbooking communities, galleries and social media sites, you may never have had the need to save images for viewing on the web before. Read on to find out how to save your images for web use to enable fast viewing and to be able to upload to online galleries. Images viewed via the web do not need to be the same resolution as images saved for printing, as the maximum viewing resolution on a monitor is 72dpi. Images should also be compressed to allow for quick displaying of images when viewed via the internet. The image should also be smaller in size than that to be printed out, as viewing size on a monitor is much smaller than that being printed out.
This tutorial explains how to save images for sharing on the web or in online galleries.
When your digital scrapbook layout is complete, the first step is to flatten your layers. Doing this prevents your layer styles from needing to be rescaled when your image sizes is reduced, which can happen on occasion, particularly in Photoshop Elements.
To flatten your layers, go to the layers palette and click on the more button in PSE or in Photoshop, the small button with a triangle pointing to the right of your screen.
From the menu which appears select flatten image.
This will flatten all the layers in your layout to a single layer.
After you have done this it is time to resize your image. In the Digital Scrapbook Place gallery, the maximum size you can upload to our gallery is 125kb. In your image menu, select Resize> Image Size. (or in Photoshop just select Image Size)
In the window that appears, you can select the size you wish to make your image. (600×600 pixels is a fairly standard gallery size)
Firstly ensure that Resample Image is checked so that you are able to access the pixel dimensions portion of the window. (constrain proportions should also be checked) In the Width and height the maximum amount of pixels should be 600. You may make it smaller if you wish however 500-600pixels is a good viewing size for the web. For a square image, you can resize it too 600×600 pixels, and for rectangular images, the maximum Width or Height is 600pixels. Just change the largest Dimension to 600 and providing Constrain Proportions is checked, the other dimension will change automatically. Once you have changed the amount of pixels to 600 or less, click on ok. This reduces the viewing size to a suitable size for viewing on the web.
Next we need to save our image for the web. This allows us to reduce file size as much as possible without reducing viewing quality. (do not use this method for layouts you wish to print)
Go to your file menu and choose Save for Web. (or Save for Web and Devices in newer versions of Photoshop)
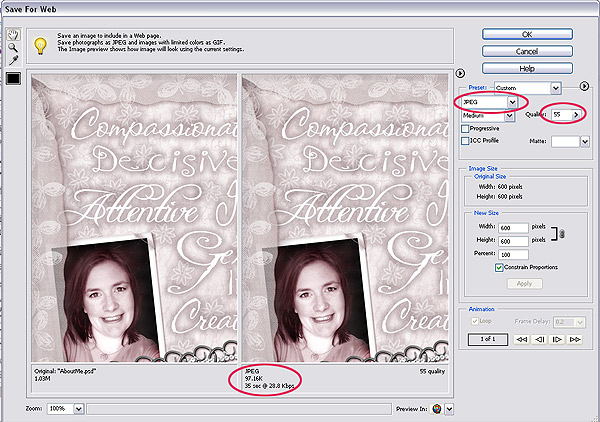
A new window will appear with two versions of your image. (in Photoshop you may need to click on the 2 Up tab) On the left is your original image and on the right is the sample of the image as you adjust its compression settings.
In the Preset box, ensure that you have JPEG selected in the box for file types. To the right of this box is a Quality box. This is where you adjust your compression level. Adjusting the level in the Quality box directly effects the file size shown under your sample image. The aim is to get the maximum viewing quality possible, with minimum file size. Play with the levels in the Quality box and see how it affects your sample image in comparison to your original image. Brightly coloured or high contrast images tend to be larger file sizes than lower contrast images.
To be able to upload your image to many digital scrapbook galleries, your image file size must be less than 125k. Check the file size under JPEG shown as above below the sample image. Generally speaking you should be able to keep your images under 100k for most layouts. If you need to zoom in to get a better view of the effect of the compression, you can click on the magnifying glass at the top left and click on your image to zoom in. (hold down the alt key and click to zoom back out). You can also optimise for File Size and choose the Maximum File size of your image.
Once you are happy with your adjustments, click on the Ok button.
Be sure not to overwrite your high resolution images by saving as the same name. You might like to put -web or -lowres at the end of your file name to indicate that the image is a low resolution image for web/email viewing.
Once you have named your file and chosen an easy to remember place on your hard drive to save it, click on Save, to save your new, low resolution version of your image.
Tip: When going back to your image in PS or PSE, remember not to re-save your original as your full printing size will be lost. You may wish to undo your sizing and layer changes before saving again, or in Photoshop you can click on Revert in the File menu to revert to the last saved version.
Happy Gallery posting!
© Clikchic Designs 2006
All Rights Reserved
Not to be reproduced without express written permission.
Related
Subscribe to the Clikchic Designs Newsletter and get a FREEBIE! There are ongoing freebies as well. Don't worry, we won't inundate you with emails.


![]()


