Have you ever wondered how to tear digital paper and make it look real? Learn how to do realistic paper tearing in photoshop.
Realistic Paper tearing in digital scrapbooking is something that can be done in many different ways, here my version of digital paper tearing. This tutorial is done in Photoshop CS, however the basic principles will apply in other versions of Photoshop and Photoshop Elements. You may also be able to apply the principles to other software packages. Select the layer you wish to apply the torn edges to by clicking on it in the layers palette. Then click on the ‘Add Layer Mask’ button at the bottom of the window (second from the left) to create a layer mask. Creating a layer mask allows you to make changes that can be easily removed from the layer at any time. To make changes to the layer mask, click on the square showing to the right of your layer thumbnail. This is your layer mask thumbnail.

Using black on your layer mask will erase from the layer much like the rubber tool and using white will bring it back. This makes it is easy to correct any over brushing by using white.

Select your brush tool from your tools menu on the left hand side.

I like to use the Rough Round Bristle for creating my torn edges but it is worth experimenting with different brushes to see which you prefer for the effect you are after. Adjust the brush size according to your layout and the size needed for the desired effect. For this layout I set mine at about 150px. Make sure you have selected black from your colour palette and begin brushing the edges of your paper, photo or matt. Ensure that the brush opacity is set at 100%.

With this particular brush it is usually necessary to go over any dark pixels that have not been properly erased to ensure you have a clean torn edge. Once you have finished creating your edge with the black brush select the layer in your layers palette below the one you are working on and then create a new layer. This will place a new layer underneath the layer you are creating the torn edge on.

To do this click on the little arrow in a circle on the top left of your layers window and select new layer.

I like to once again use the Rough Round Bristle for the under portion of the torn edge. Once again you might like to experiment with different brushes to get different effects. This particular brush gives a nice textured effect to this portion of the torn edge. Select an appropriate colour to match your paper or photo. In the case of photos I like to use white as photos are printed on white paper and give a white torn edge. For coloured paper I would use a slightly lighter shade of the same colour. Choose a brush size for your desired effect. I used approx 150 once again.

Begin painting the torn portion of the paper on the layer beneath your photo or paper by dragging your brush along the middle of the edge of your torn paper. You may wish to tidy up the edges with your rubber tool and by selecting the same brush. Once you have completed the edge on your photo or paper you may wish to apply a drop shadow to this layer.

To apply a drop shadow select Layer, Layer Style and then Drop Shadow from your menu.

Adjust the settings to suit your layout. Different colours will require different shadow strengths and the further the paper away from the layers below the softer and larger the shadow will be. The closer it is the darker and smaller the shadow will be. For the sake of realism in a paper style layout I prefer to keep my shadows quite small and subtle. Fiddle with the Opacity, Distance, Spread and Size settings to achieve your desired effect.

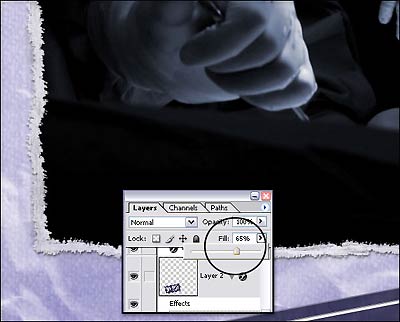
You may wish to apply further effects on the torn edge portion of the paper, in this case the white portion or the layer beneath your paper or photo. You may wish to apply textures similar to that of the above layer, or a texture to simulate torn paper. Some people like to add noise. Personally I do not think this technique requires any further textures or effects but this will differ according to taste and the style of your papers and layouts. I also like to slightly lower the fill opacity of the white torn edge. Again this is a matter of taste and may not suit your paper or layout. You may prefer to use the rubber tool for this purpose with a lowered opacity to brush over the edges to simulate the effect of the thinned edge of torn paper.

There are many different methods of creating a torn paper edge, and this is the one I like to use for my layouts and kits.
© Clikchic Designs 2005 All Rights Reserved Not to be reproduced without express written permission
Subscribe to the Clikchic Designs Newsletter and get a FREEBIE! There are ongoing freebies as well. Don't worry, we won't inundate you with emails.

What an amazing photo!! So incredible.
It just captures that moment so beautifully.
Makes me want to have another one!
I read similar article also named Realistic Paper Tearing in Photoshop, and it was completely different. Personally, I agree with you more, because this article makes a little bit more sense for me