A wonderful technique for softening the look of your photos and reducing the effect of blotchy skin is to use the diffuse glow filter in Photoshop. You can take advantage of this wonderful filter to make a dramatic change, or just a subtle adjustment.
Firstly open the photo you wish to apply the filter to. You may wish to save it as (File>Save As – remember to rename the file when you save) a new file to preserve the original. For the purpose of this article we will work with this photo.

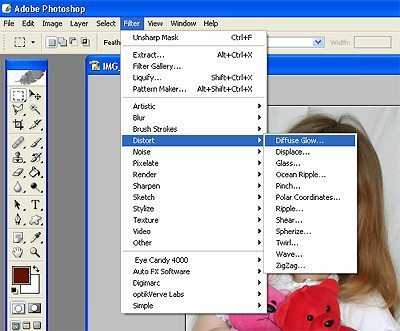
To apply the filter, go to the Filter menu > Distort > Diffuse Glow (Note: that your background colour on your colour swatches must be set to white for this to work effectively.)
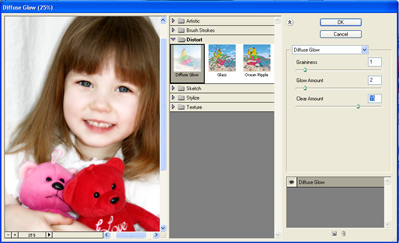
You may need to adjust the zoom settings on the bottom left of the window to enable you to view enough of your image in the window provided.
By adjusting the Graininess, Glow Amount and Clear Amount you can experiment with the settings to get the desired effect, depending on how dramatic a change you would like to achieve. I usually like to make the change a little more dramatic and fine tune the changes by using the Fade setting in the Edit menu. Once you are happy with the result, click on OK.
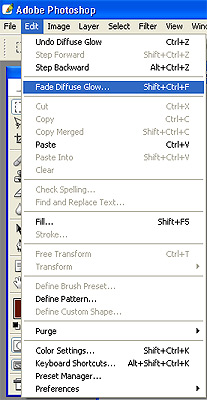
As mentioned above you can fine tune the changes by using the Fade Diffuse Glow option in the edit menu. This option is no longer available once you make any further adjustments to the image, so should be done immediately upon applying the Diffuse Glow filter.
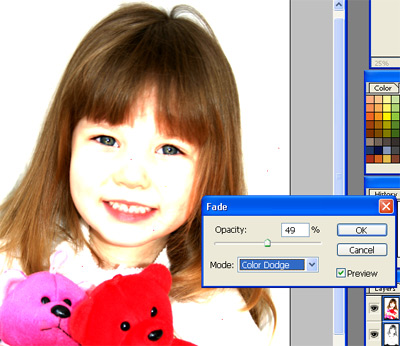
You can fine tune the Diffuse Glow settings by using the Opacity slider. Doing it this way enables easier control of the effects and allows you to better see how the adjustments effect the image.

In this instance I reduced the opacity by 69%. You may prefer a different setting depending on your image and how you applied the filter originally.
It is also possible to adjust the Mode settings to get different effects. One of the effects is shown below.
However, in this instance, I want a much softer look, and have left the Mode setting set to normal, giving the end result below.

© Clikchic Designs 2006, 2009
Subscribe to the Clikchic Designs Newsletter and get a FREEBIE! There are ongoing freebies as well. Don't worry, we won't inundate you with emails.