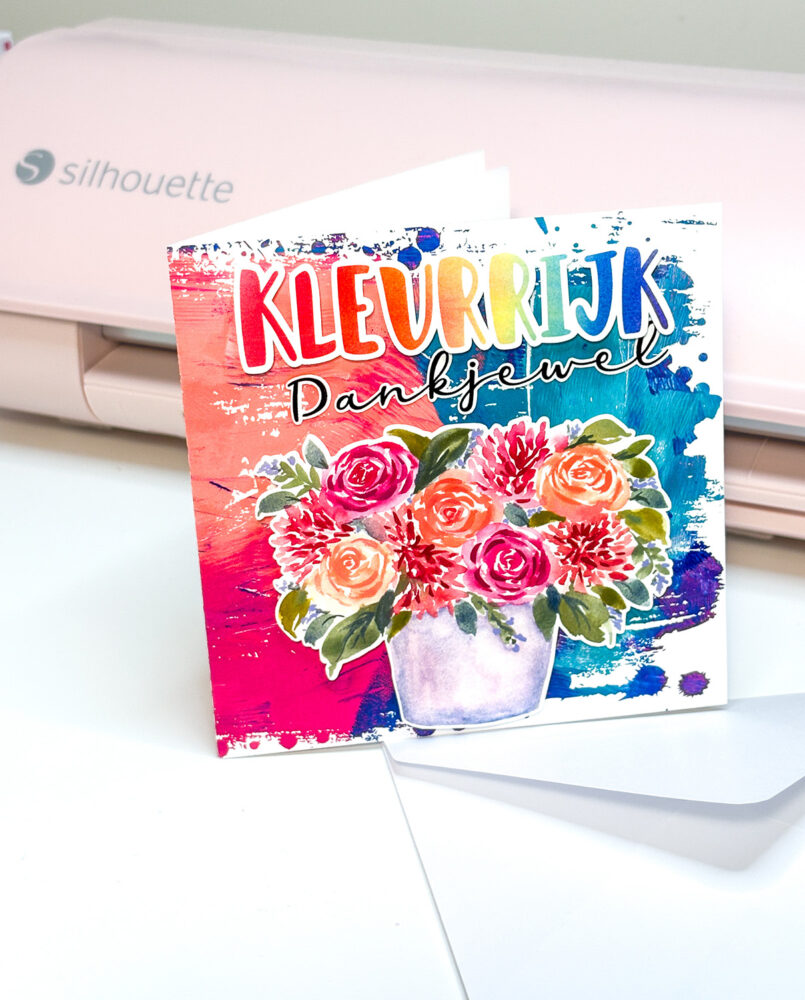
Creating your own handmade Thank You cards is a wonderful way to share appreciation in a personal and creative way. With digital crafting, it’s easier than ever to design professional-looking cards for a friend or family member using beautiful watercolor backgrounds, floral illustrations, and stylish sentiments. In this tutorial, I’ll show you how to make a unique Thank You card using my designs from the Clikchic Designs Silhouette Store. This project combines a textured grunge-style base, vibrant watercolor florals, and a soft rainbow ombre sentiment to create a heartfelt card perfect for any occasion.
For a quick look at how the project comes together, you can watch the short tutorial video below :at the end of this article. Scroll on to find out what you need.
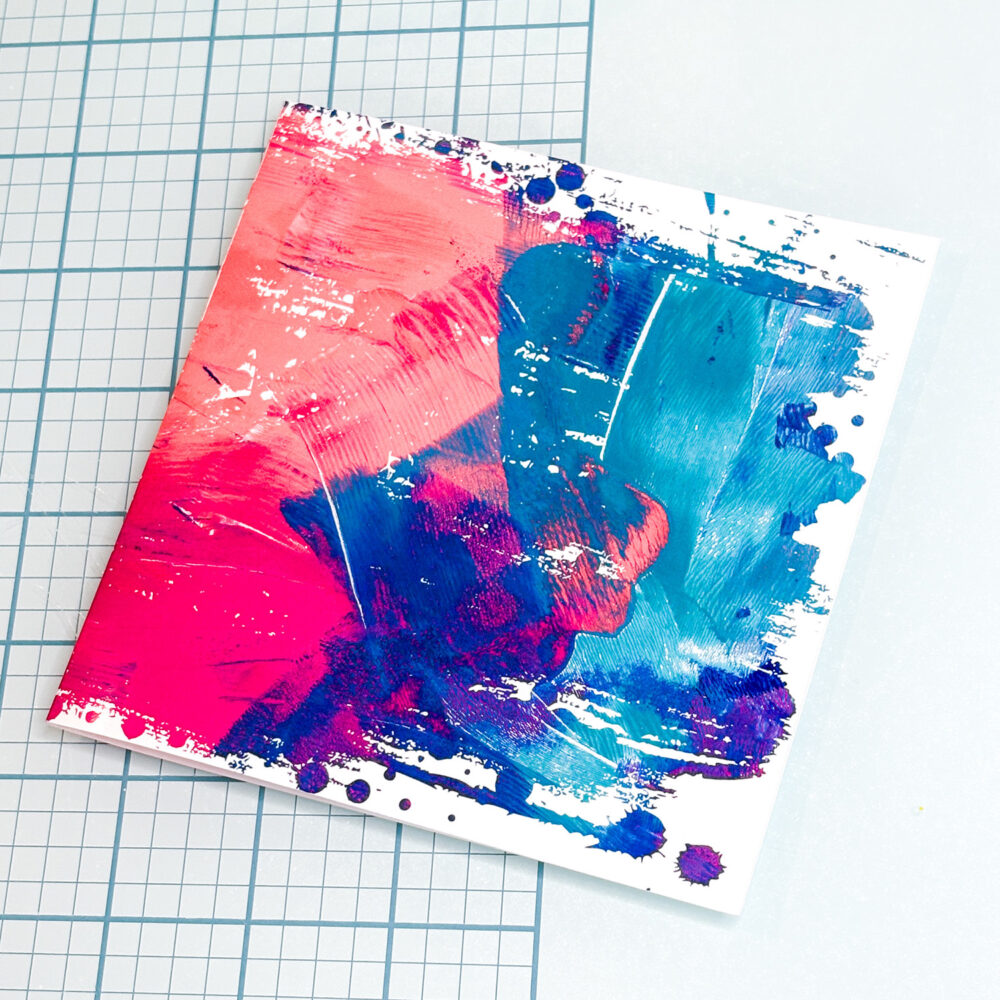
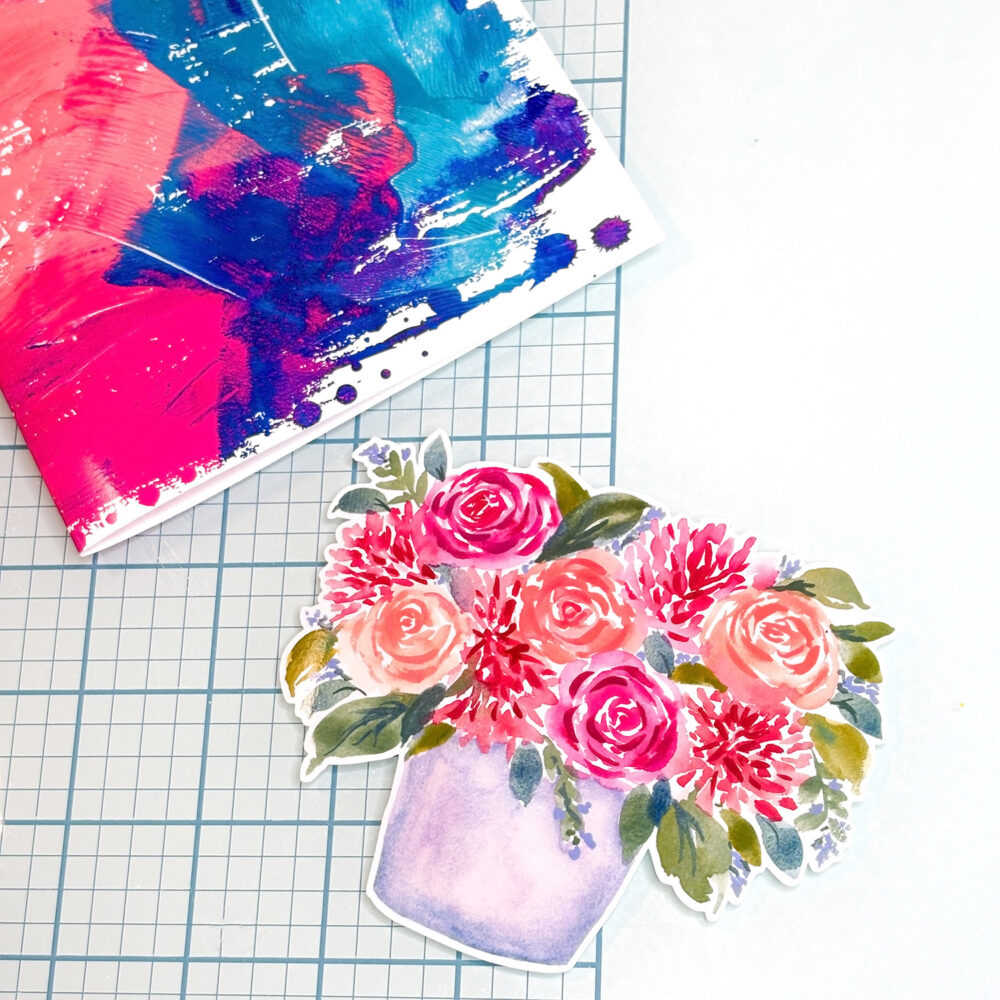
Open the Dotted Mess Urban Grunge Clipping Mask and size to suit your card base. Drag the Fuschia Peach Teal Blue Abstract Grunge Background in Silhouette Studio® to the Dotted Mess Urban Grunge Clipping Mask, hover patiently till the shape fills with the design and then release your mouse. (see this tutorial for more info on this process) Resize it to fit your card base (perfect for a 5×5” folded card). Place the over the background and use it to create a distressed edge effect. Create a rectangle to use as a card base surrounding the grungy framed image and add a score line or snag this freebie to use for this over and over for your square cards. Print and cut this layer on photo paper for a polished finish. (make sure the cut lines on the grungy outline are turned off)
Step 2: Add the Floral Feature
Bring in the Pink Peach Watercolor Roses & Dahlias Flowers in Pot Print & Cut design. Print and cut the floral piece, then attach it to the centre of your card front using foam tape or adhesive for added depth. The delicate watercolor roses and dahlias create a vibrant, eye-catching focal point.
Step 3: Design the Sentiment
Use the Rainbow Ombre Watercolor Gradient Background to craft your “Colourful Thank You” sentiment. Type your message in Silhouette Studio®, fill the letters for “colourful” (Kleurrijk) with the gradient background. Add an offset to the Colourful and thank you that suits you and cut them out using your cutting machine. Position the sentiment above the floral arrangement on the card base using your chosen glue method to complete your design with a cheerful burst of colour. I used foam squares for the flowers and “Colourful” (Kleurrijk) and a glue pen for the “Thank You” (Dankjewel) which is a script font with an offset.
Step 4: Assemble and Finish
Layer your pieces onto the grunge background base. Adjust until balanced, then secure with foam squares or preferred method. The combination of abstract watercolor textures, painterly florals, and a rainbow gradient greeting makes this card a joyful way to show your appreciation.
If you’ve ever wondered how I get my Print & Cut designs to look so vibrant, crisp, and just a little bit extra shiny—you’re not alone! One of the most common questions I get is, “How do you make your printed designs look so good?” The secret? I use gloss photo paper and a high-quality inkjet printer—and it makes a huge difference.
In this post, I’ll walk you through why gloss photo paper is my go-to for Print & Cut crafts, how it compares to regular cardstock, and why your choice of printer (inkjet vs laser) also plays a big role in the final result.
If you would like to check out some of the designs in my store used in the photo to the right, check out my store here. I specialise in watercolor print and cut designs.
What Makes Gloss Photo Paper So Special?
Gloss photo paper is specifically designed for high-quality image printing. It has a smooth, coated surface that enhances colours, contrast, and detail. Here’s why it’s a game changer:
Vibrancy: The glossy coating helps the ink stay on the surface instead of being absorbed into the paper fibres, which means richer, brighter colours.
Sharp Detail: Photo paper gives you cleaner lines and finer details—great for intricate designs or watercolour textures.
Professional Finish: That shiny, polished surface gives your project a more finished and professional look. Think sticker-quality prints without the need for extra lamination.
Quick Drying: High-quality photo papers are quick-drying and smudge-resistant, which is ideal for Print & Cut projects where precision matters.
Gloss Photo Paper vs Regular Cardstock
Cardstock is thick and sturdy, which makes it great for structural elements like cards or boxes. But when it comes to image quality—especially for decorative elements like florals, labels, or illustrations—it doesn’t stand a chance against gloss photo paper.
Feature
Gloss Photo Paper
Regular Cardstock
Colour Vibrancy
High
Moderate
Print Detail
Crisp and defined
Slightly muted
Surface Finish
Glossy & smooth
Matte or slightly textured
Ink Absorption
Minimal (stays on top)
High (absorbs into paper)
Best Use
Decorative print elements
Card bases, sturdy pieces
Inkjet vs Laser Printers: What’s the Difference?
This one often surprises people: inkjet printers and laser printers use entirely different methods for printing, and each affects your output in different ways—especially when printing on photo paper.
Inkjet Printers
Use liquid ink droplets
Best suited for photo-quality, full-colour prints
Ideal for glossy or coated papers
Produces vibrant, rich colours and subtle gradients
Best choice for Print & Cut when using photo paper
Laser Printers
Use toner (powder) fused with heat
Better for high-speed, high-volume text printing
May not bond well with glossy surfaces
Can result in flaking, dull colours, or blurred images on photo paper
Not ideal for glossy photo paper—results may be patchy or prone to smudging
Tips for Using Gloss Photo Paper in Print & Cut Projects
Use the right print settings: Select “photo paper” or “glossy paper” in your printer settings to optimise ink distribution.
Let it dry: Even quick-dry paper needs a few minutes before handling—especially if you’re layering or cutting straight away.
Use a light tack mat: Glossy paper can stick too well to high-tack mats and may tear when removing.
Cut settings: Adjust your Silhouette or Cricut blade settings for thicker coated paper—do a test cut first.
Final Thoughts
If you’re aiming for that wow factor in your Print & Cut designs, switching to gloss photo paper and an inkjet printer is one of the easiest upgrades you can make. The difference in print quality is instantly noticeable—more vibrant colours, sharper details, and a gorgeous glossy finish that truly elevates your projects.
So if your prints have been looking a little dull or flat, give photo paper a try. Your crafts will thank you—and so will your followers!
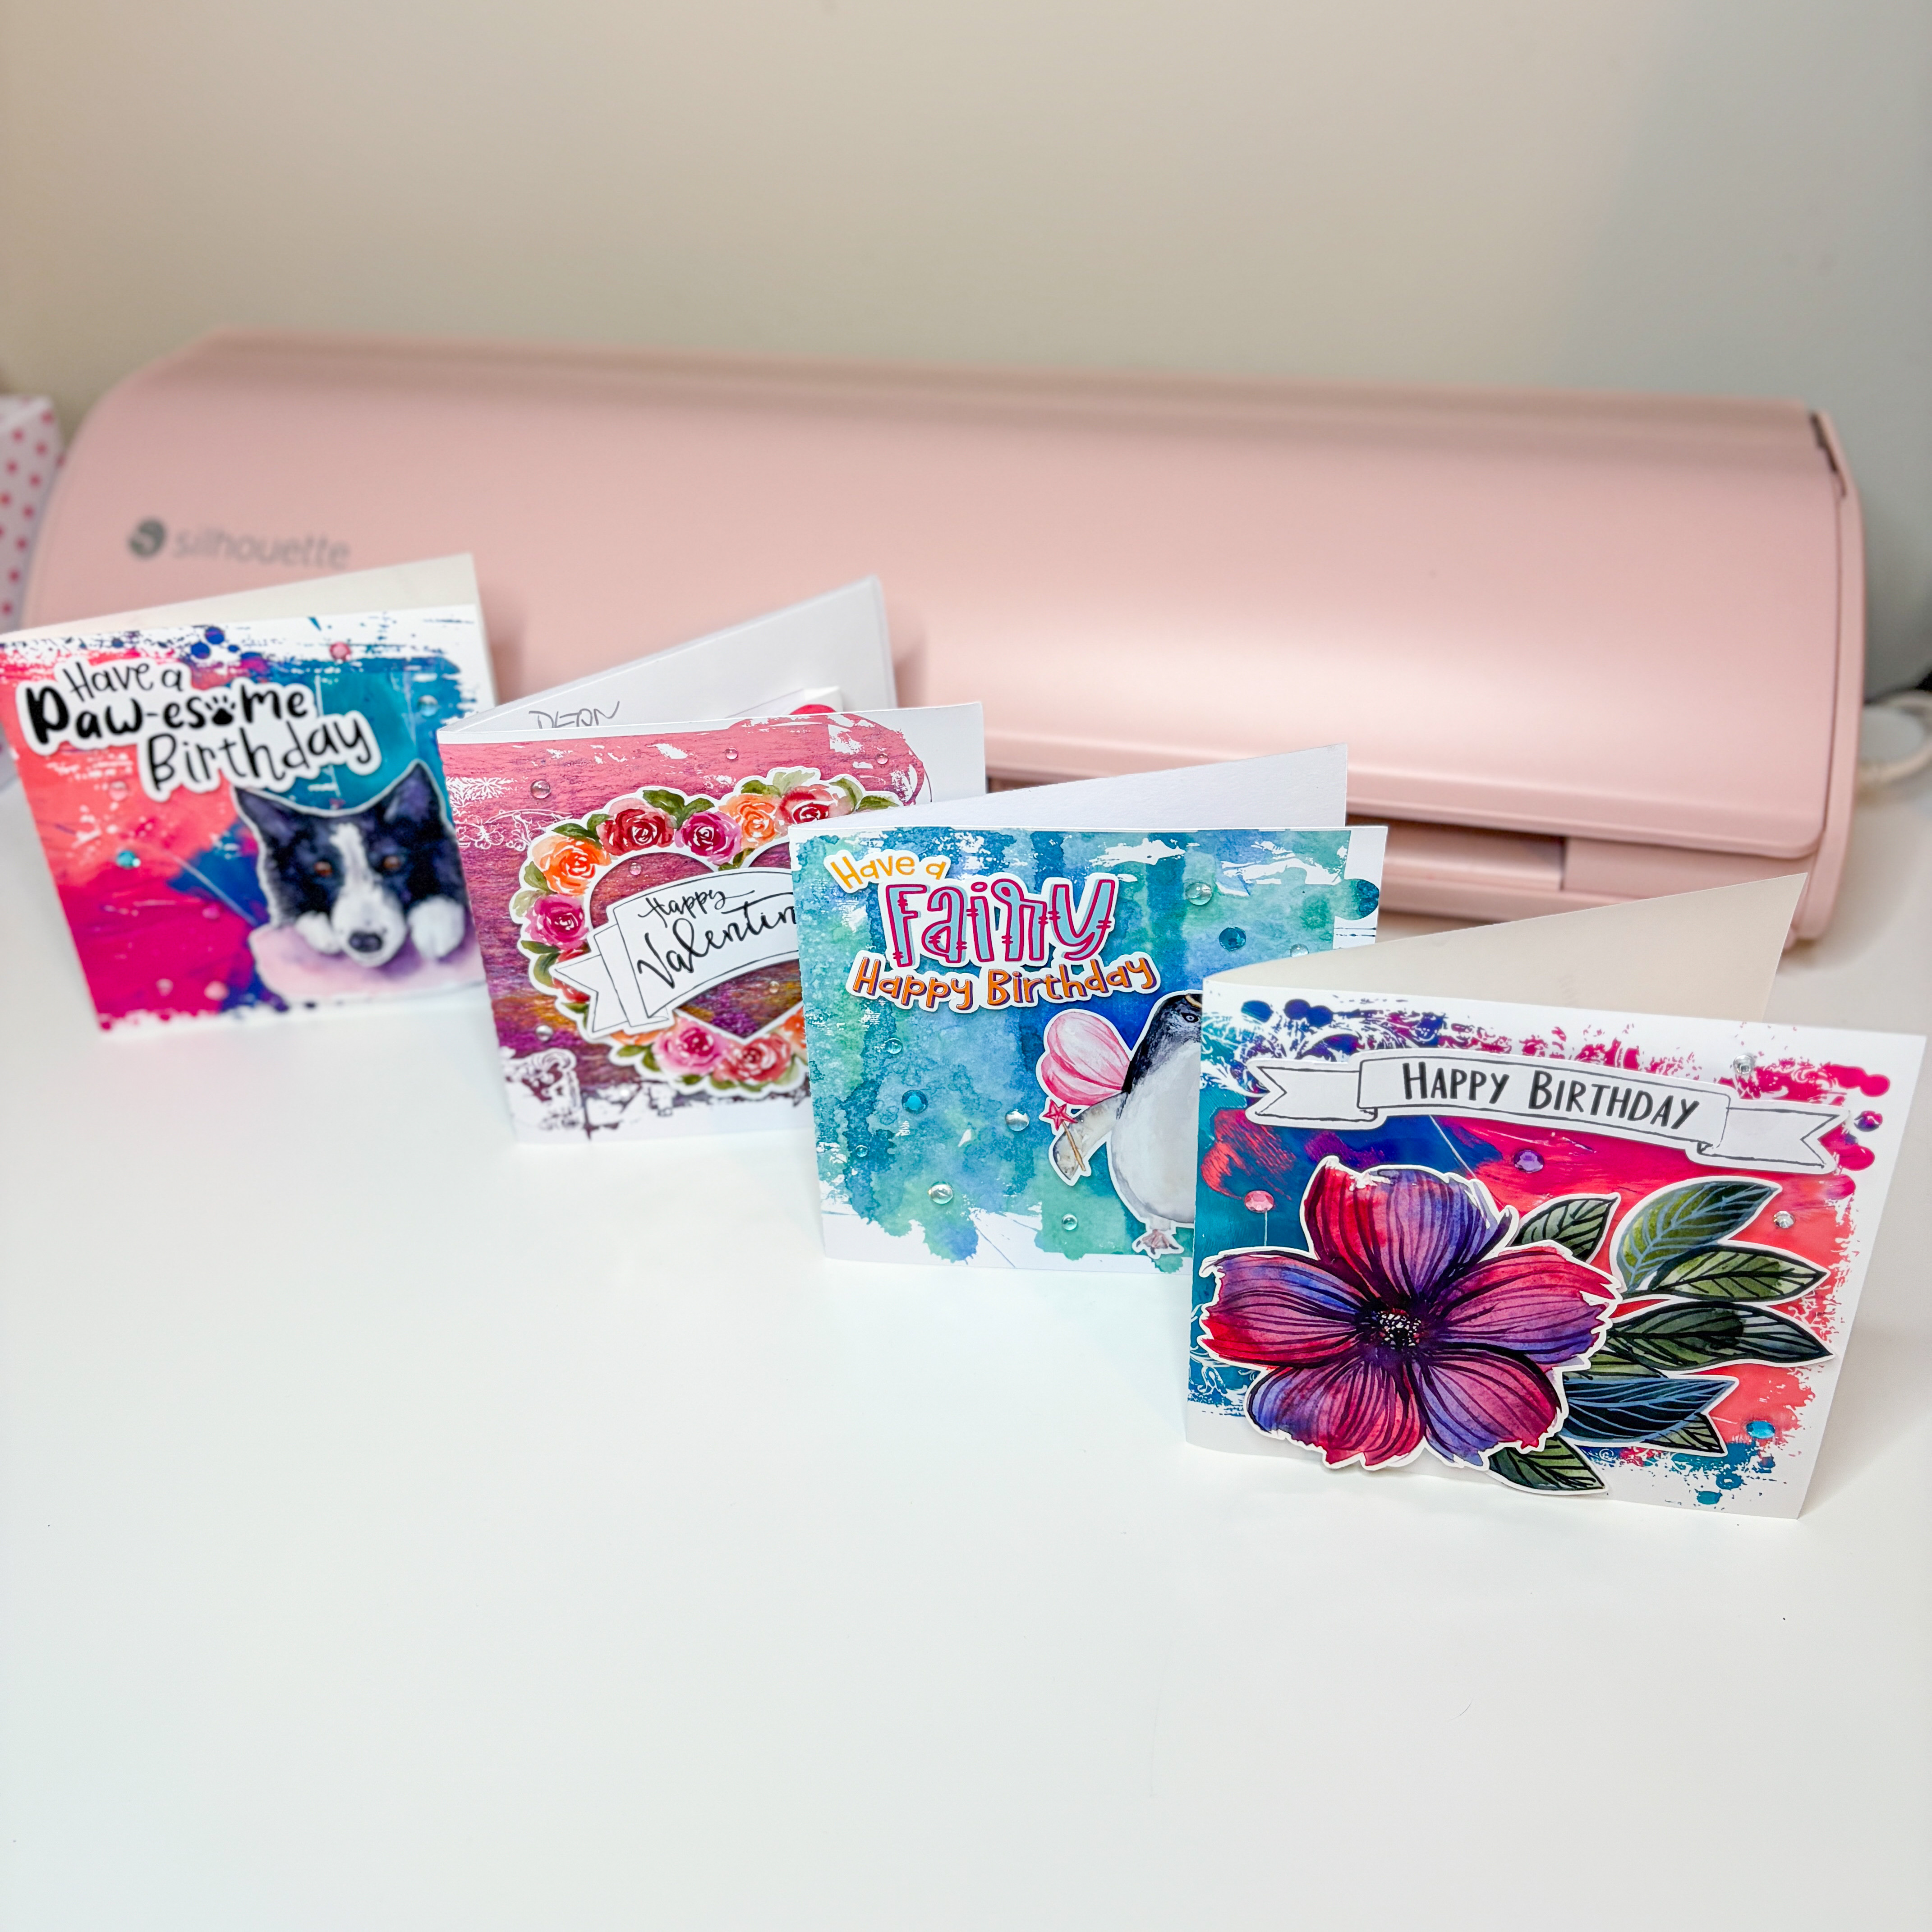
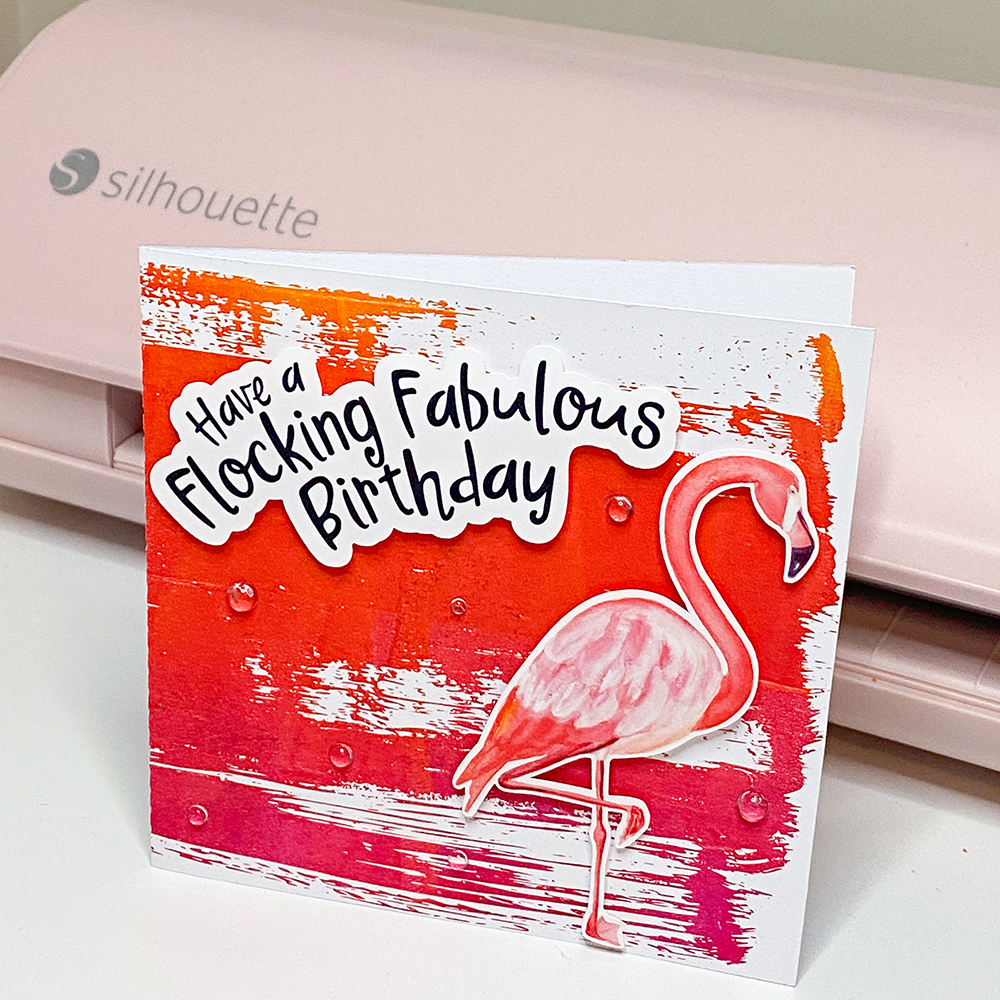
Looking for a handmade birthday card with bold tropical vibes? This flamingo-themed birthday card is bright, cheerful, and so much fun to make. Using a Print & Cut flamingo, a cheeky sentiment, a painted monoprint background, and a dry paint-style clipping mask frame, this project is perfect for Silhouette Studio users who love combining painterly effects with clean digital design.
To recreate this look, you’ll need these Silhouette Design Store files: Flamingo Watercolor Print & Cut (D-1270614) Download here Flocking Fabulous Birthday Sentiment (D-1270612) Download here Yellow Red Magenta Monoprint Background (385854) Download here Dry Paint Grunge Clipping Mask Frame (D-368127) Download here
Cut the sentiment from coordinating cardstock, or print and cut using the include offset.
Assemble the card using glue or foam tape to add depth and dimension.
The finished result is a fun, layered birthday card perfect for summer celebrations and flamingo fans alike. See the full process in the Instagram Reel! (don’t forget to follow!)
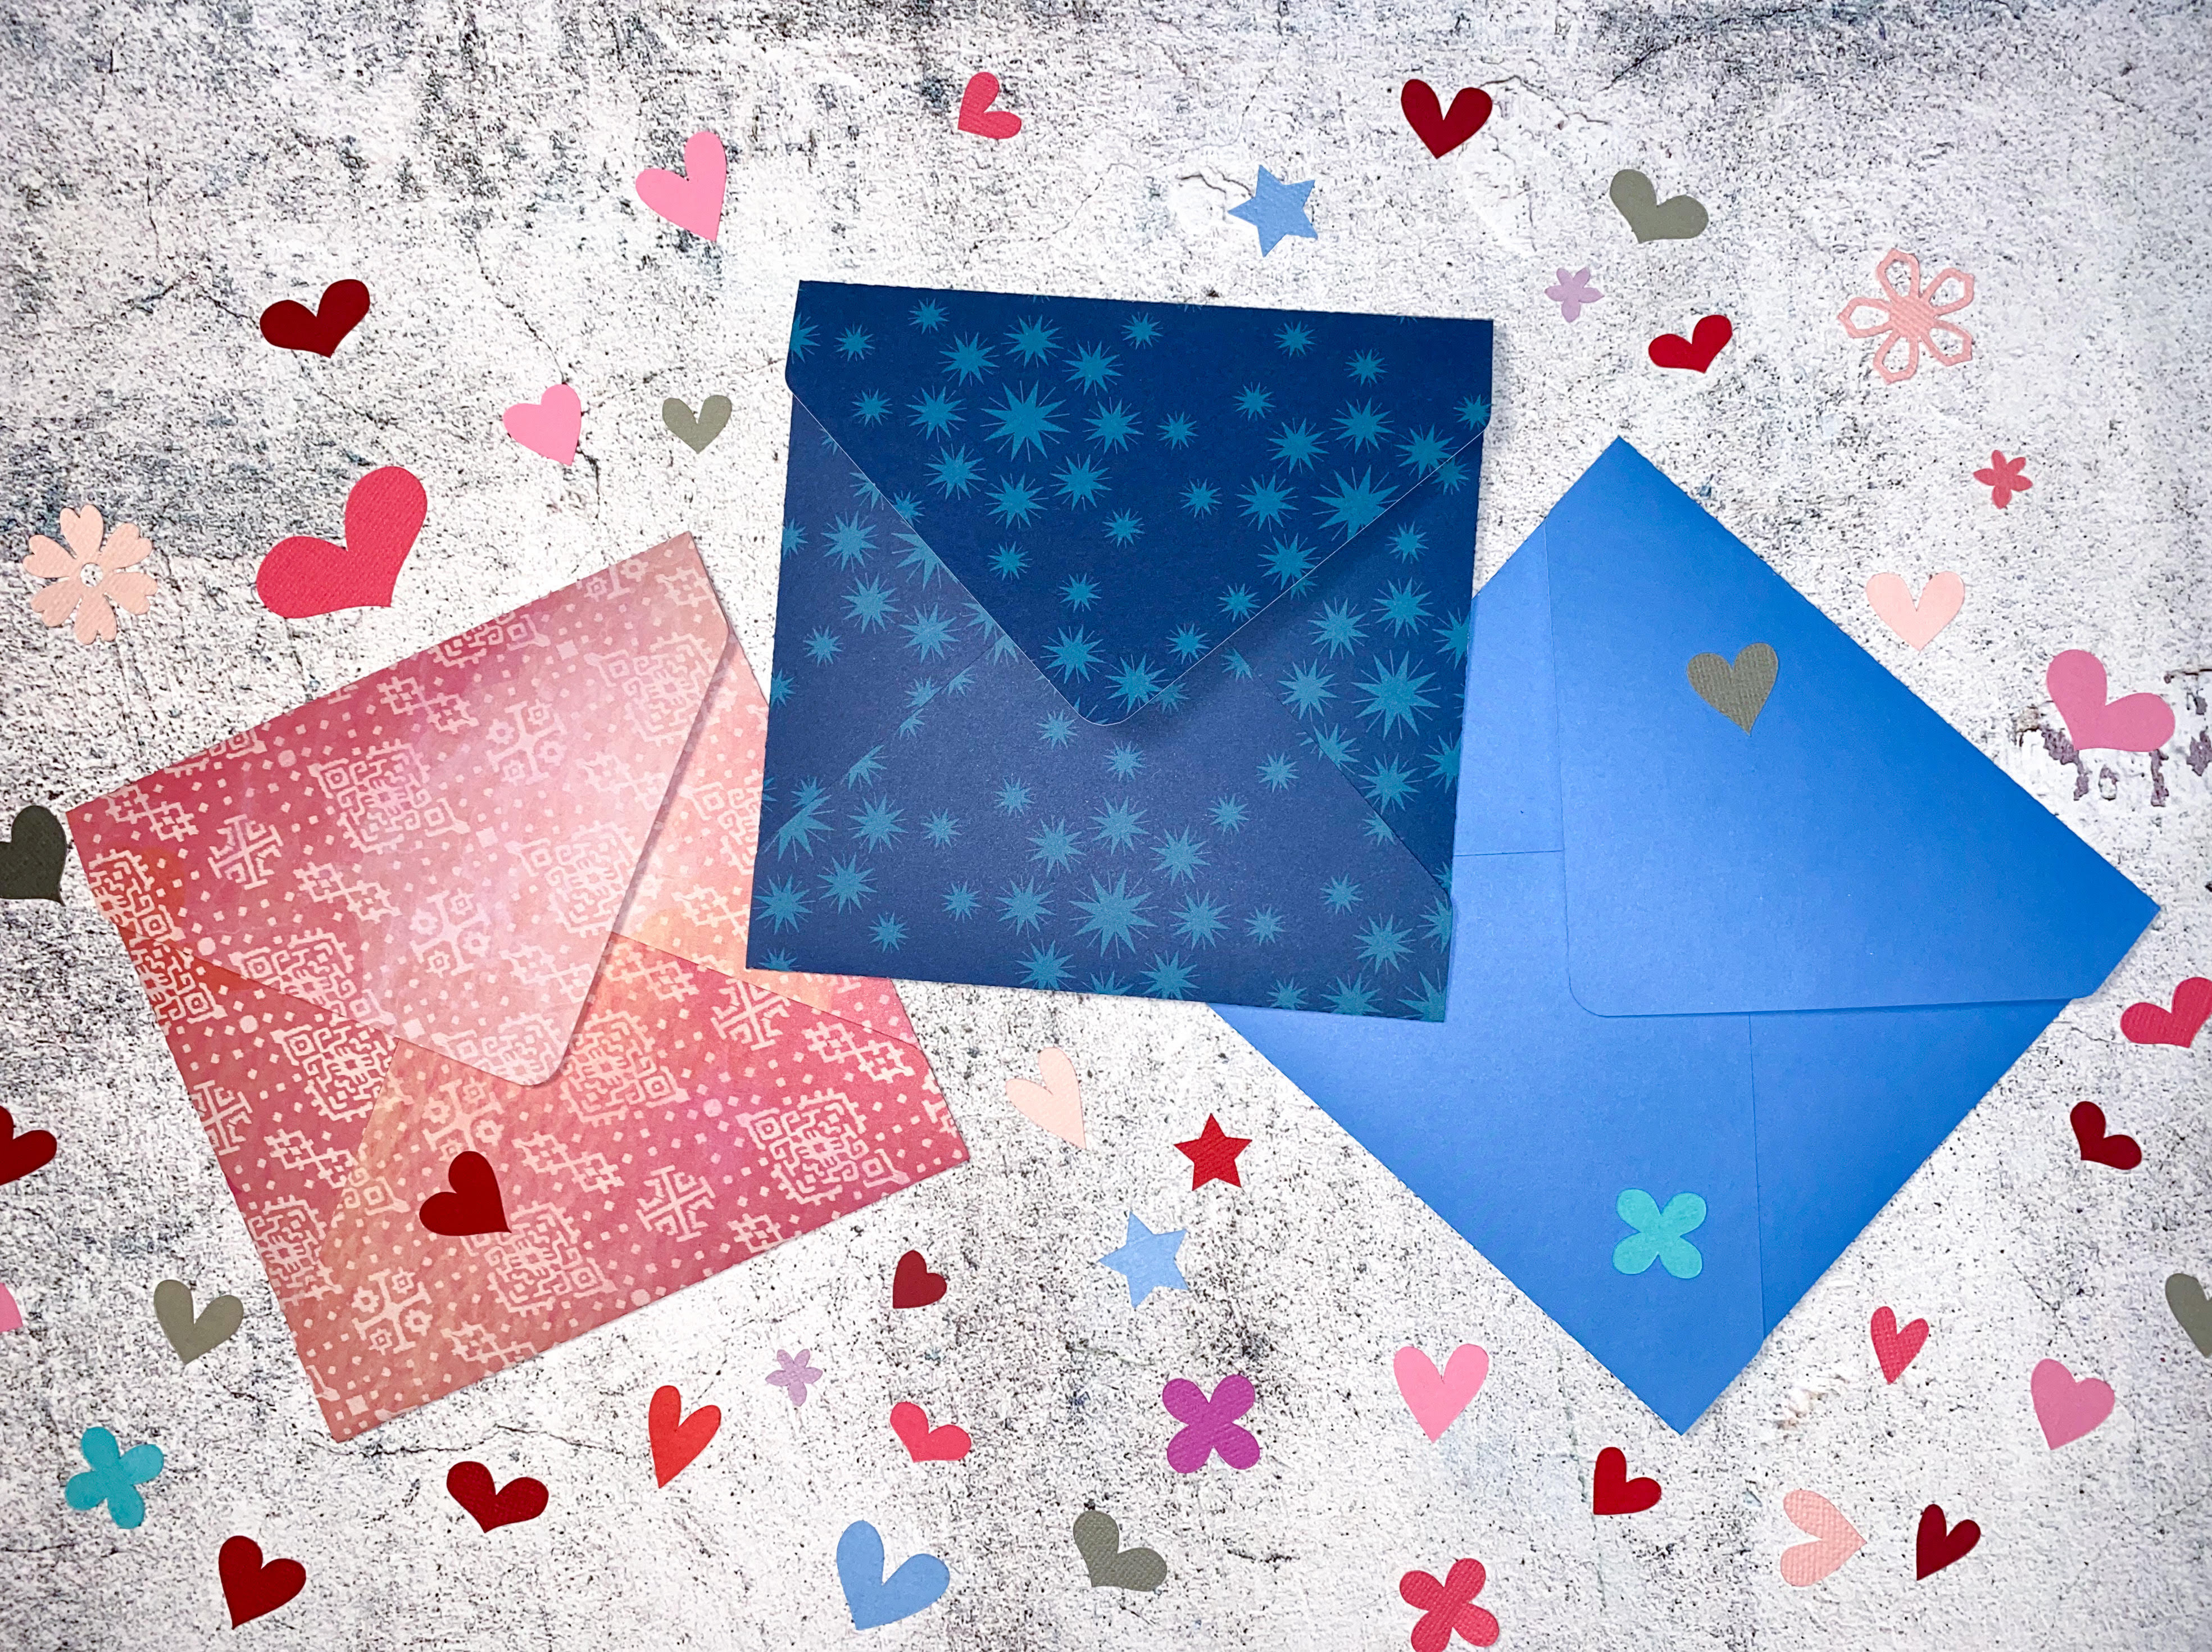
If you love making handmade cards and invitations, you know how important presentation is. The Square Envelope SVG Cutting File by Clikchic Designs makes it quick and easy to create elegant envelopes that perfectly coordinate with your cards—adding a beautiful, professional finish without the extra effort.
Exclusively on the Silhouette Design Store, you’ll find a versatile square envelope file ready to be resized for any project. With just a quick scale adjustment in Silhouette Studio, you can create envelopes to match a variety of square card sizes.
To help you get the sizing just right, use this handy guide to resize your envelope design:
5 Inch Card – Resize to 8.721 inches wide
5.25 Inch Card – Resize to 9.128 inches wide
5.5 Inch Card – Resize to 9.529 inches wide
5.75 Inch Card – Resize to 9.976 inches wide
6 Inch Card – Resize to 10.406 inches wide
6.25 Inch Card – Resize to 10.793 inches wide
6.5 Inch Card – Resize to 11.190 inches wide
Want to skip the resizing and get all seven sizes instantly? Grab the full multi-size set from:
To make it even easier, a step-by-step video tutorial is available showing just how simple it is to assemble your envelope once it’s cut. The folding and gluing process is fast and beginner-friendly—making this an ideal project for any paper crafter.
Quick to cut, simple to assemble, and stunning in presentation—this envelope file makes it easy to elevate your cardmaking with coordinated envelopes for every occasion.
Here are the alternate envelope sizes available in my stores:
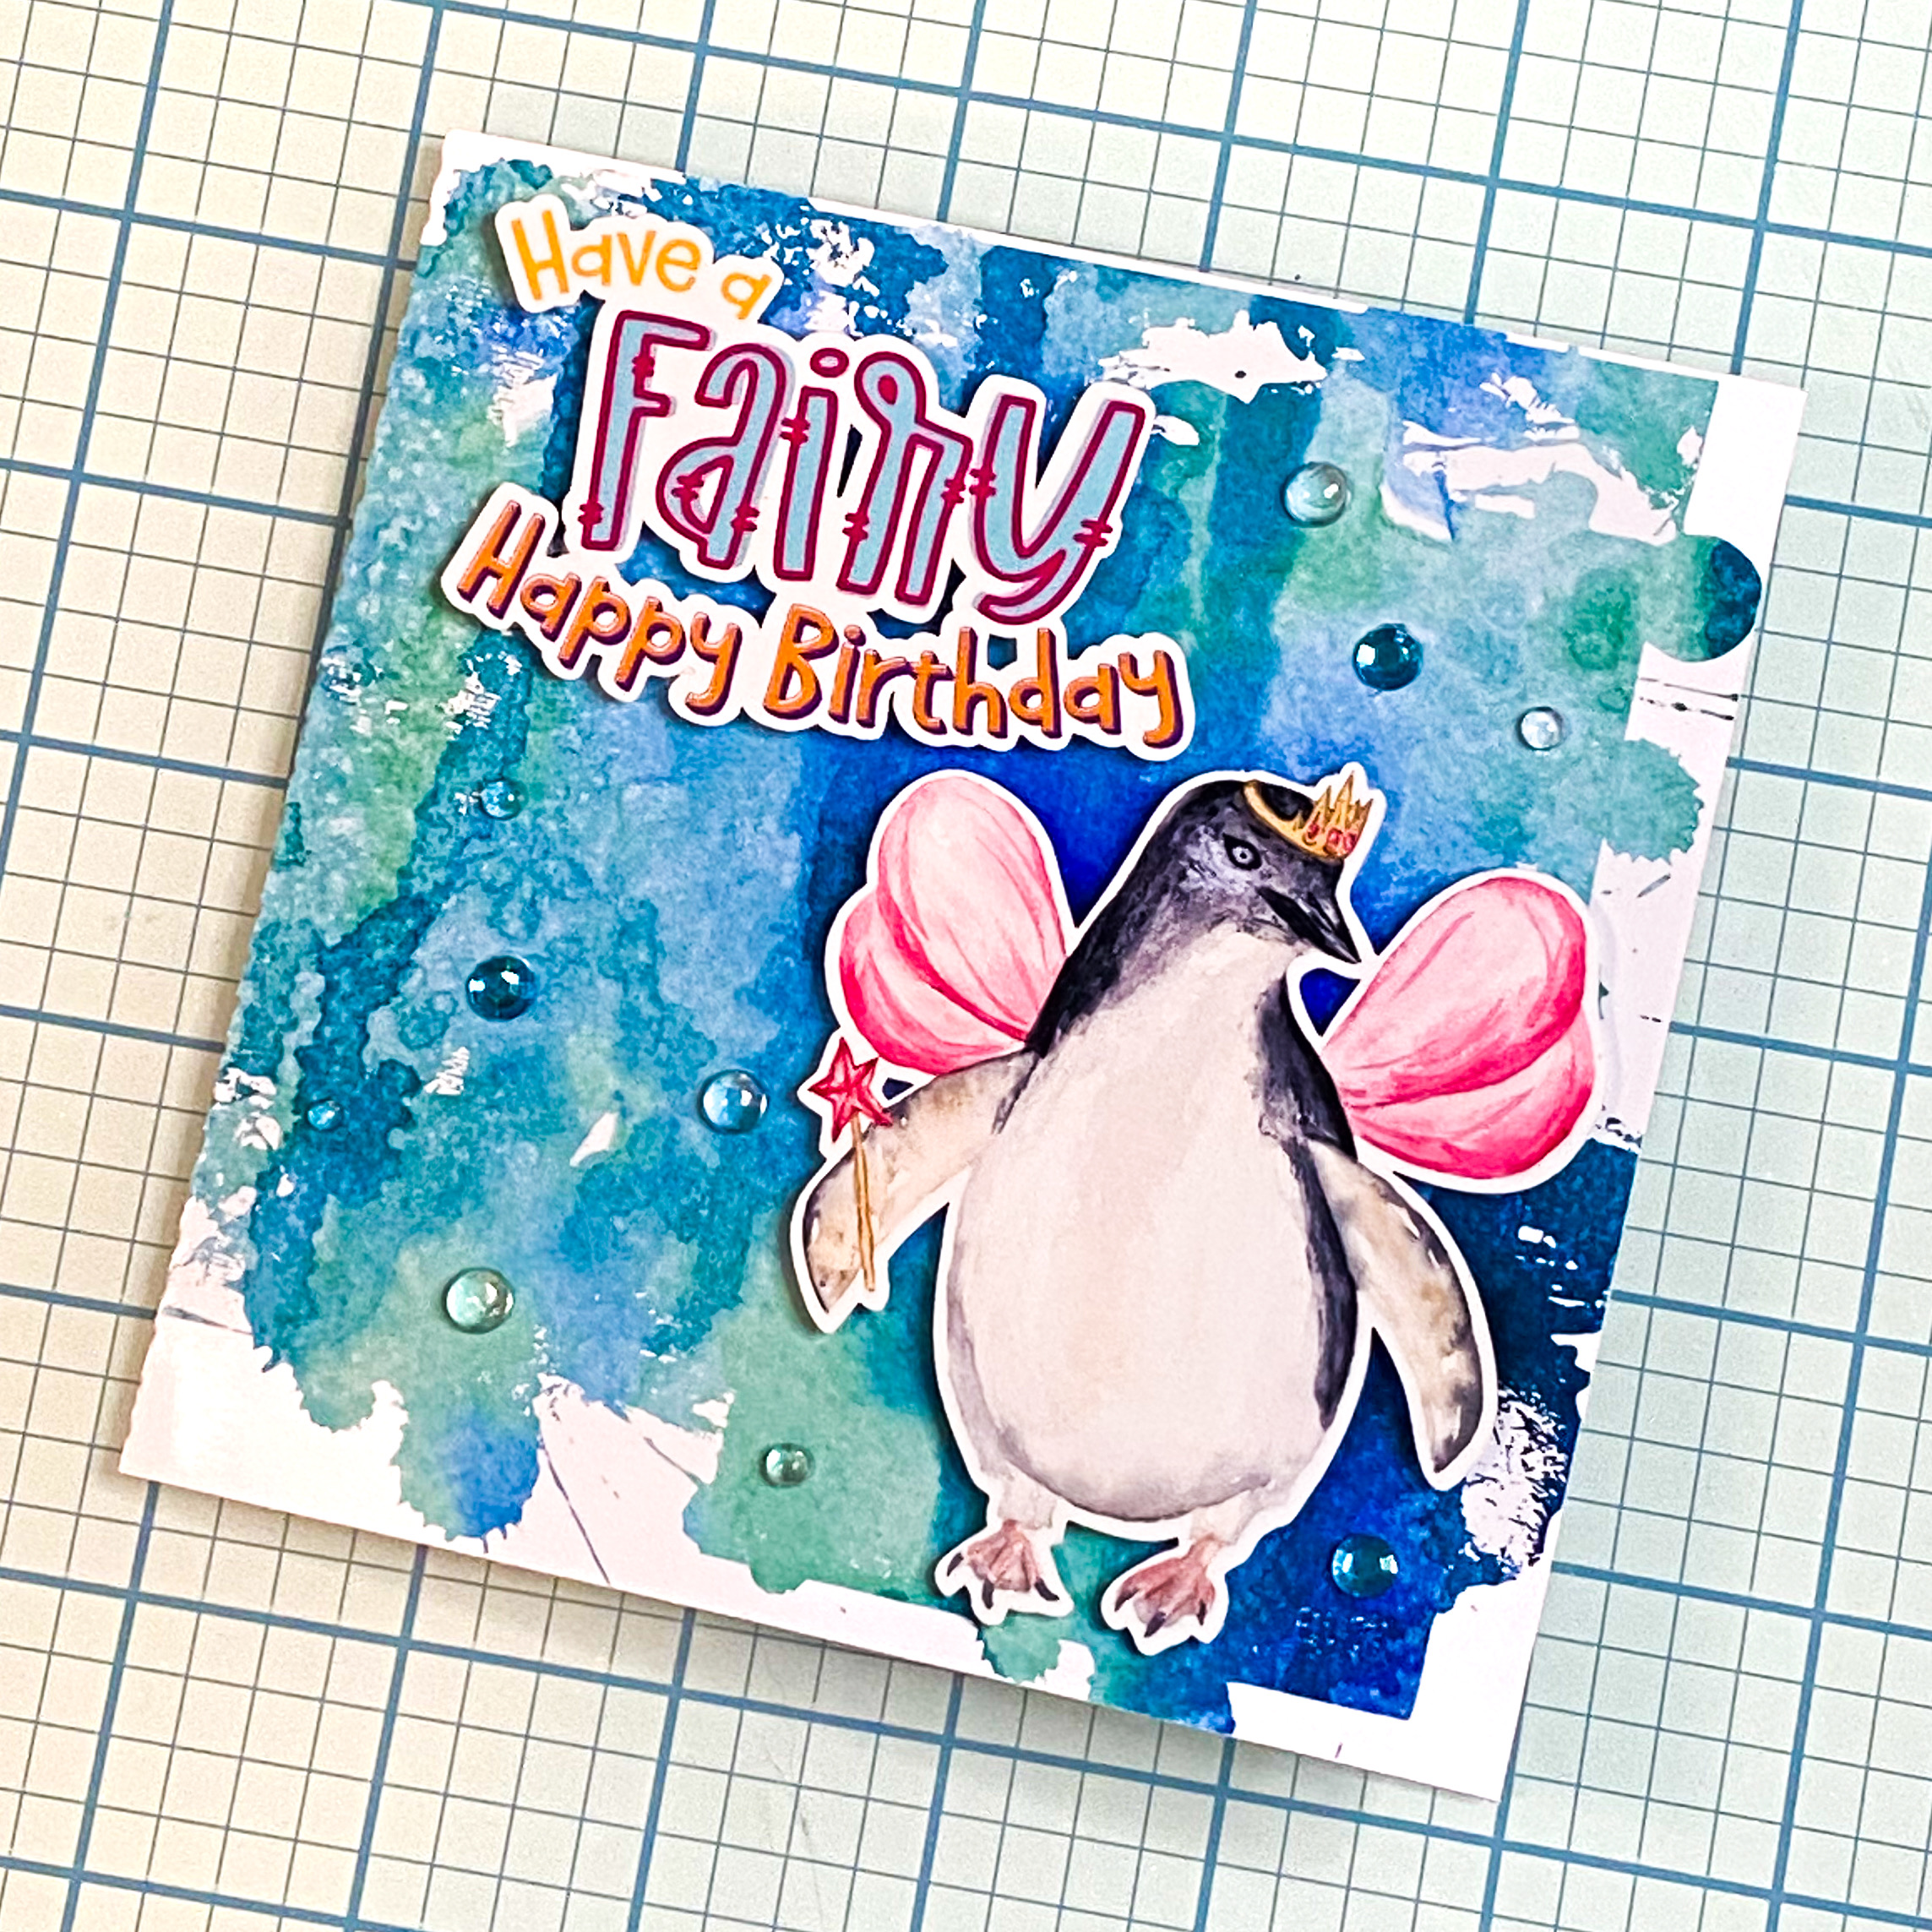
Fairy Penguins are undeniably adorable, and if you haven’t heard of them, they are a small penguin species native to Australia. Inspired by their whimsical name, I painted a watercolor Fairy Penguin and added whimsical fairy wings, a fairy crown, and a wand to create a beautiful watercolor print and cut Fairy Penguin. To complement this charming design, I created a birthday sentiment with the perfect pun, making it an ideal addition to your crafting projects.
These delightful print and cut designs are versatile and perfect for cardmaking, scrapbooking, art journaling, and more. You can find the store links for the sentiment and Fairy Penguin below, along with links for the SVG Clipping Mask and Printable Background used to create the card in the image. Whether you’re a seasoned crafter or just starting, these designs will add a touch of magic to your creations. Explore the enchanting world of Fairy Penguins and let your creativity soar with these beautiful crafting elements. Happy crafting!
Click here to download the card base FREEBIE! You will need to unzip the file before use. It is a simple but super useful file to have on hand to have a head start on your square card bases. It is also super easy to resize to suit your needs.
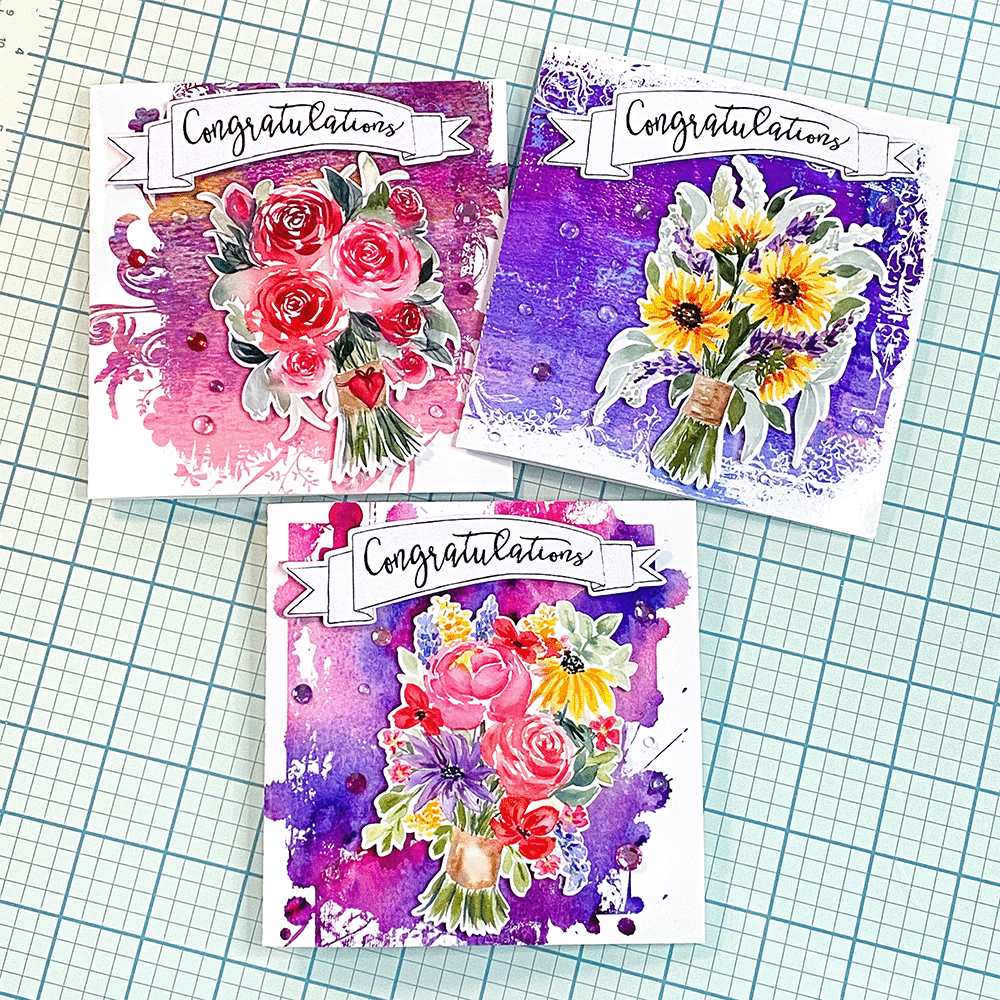
I have had three family members recently participate in varying roles in the Musical Production of the Sound of Music at a local High School. Two nieces had major roles and my sister in law who teaches at the school was the director. To say we were blown away by the stellar efforts of all three was an understatement. So of course I wanted to create some cards for them to tell them so and congratulate them on their hard work and achievements with the production.
I just love the vibrant colours coupled with the grungy goodness and gorgeous watercolor bouquets on these cards. I’d like to think they would brighten the day of any recipient who received them.
For the backgrounds I have been using a technique in Silhouette Studio of using SVG files as a clipping mask. I have a quick tutorial here on how to do it. Elly Mae of Silhouette Secrets has a more in depth tutorial, and has done a live YouTube video on the technique which you can watch on replay. I use a card base template, for which I have created a freebie to make creating these cards easy! Check out this article for the FREEBIE!
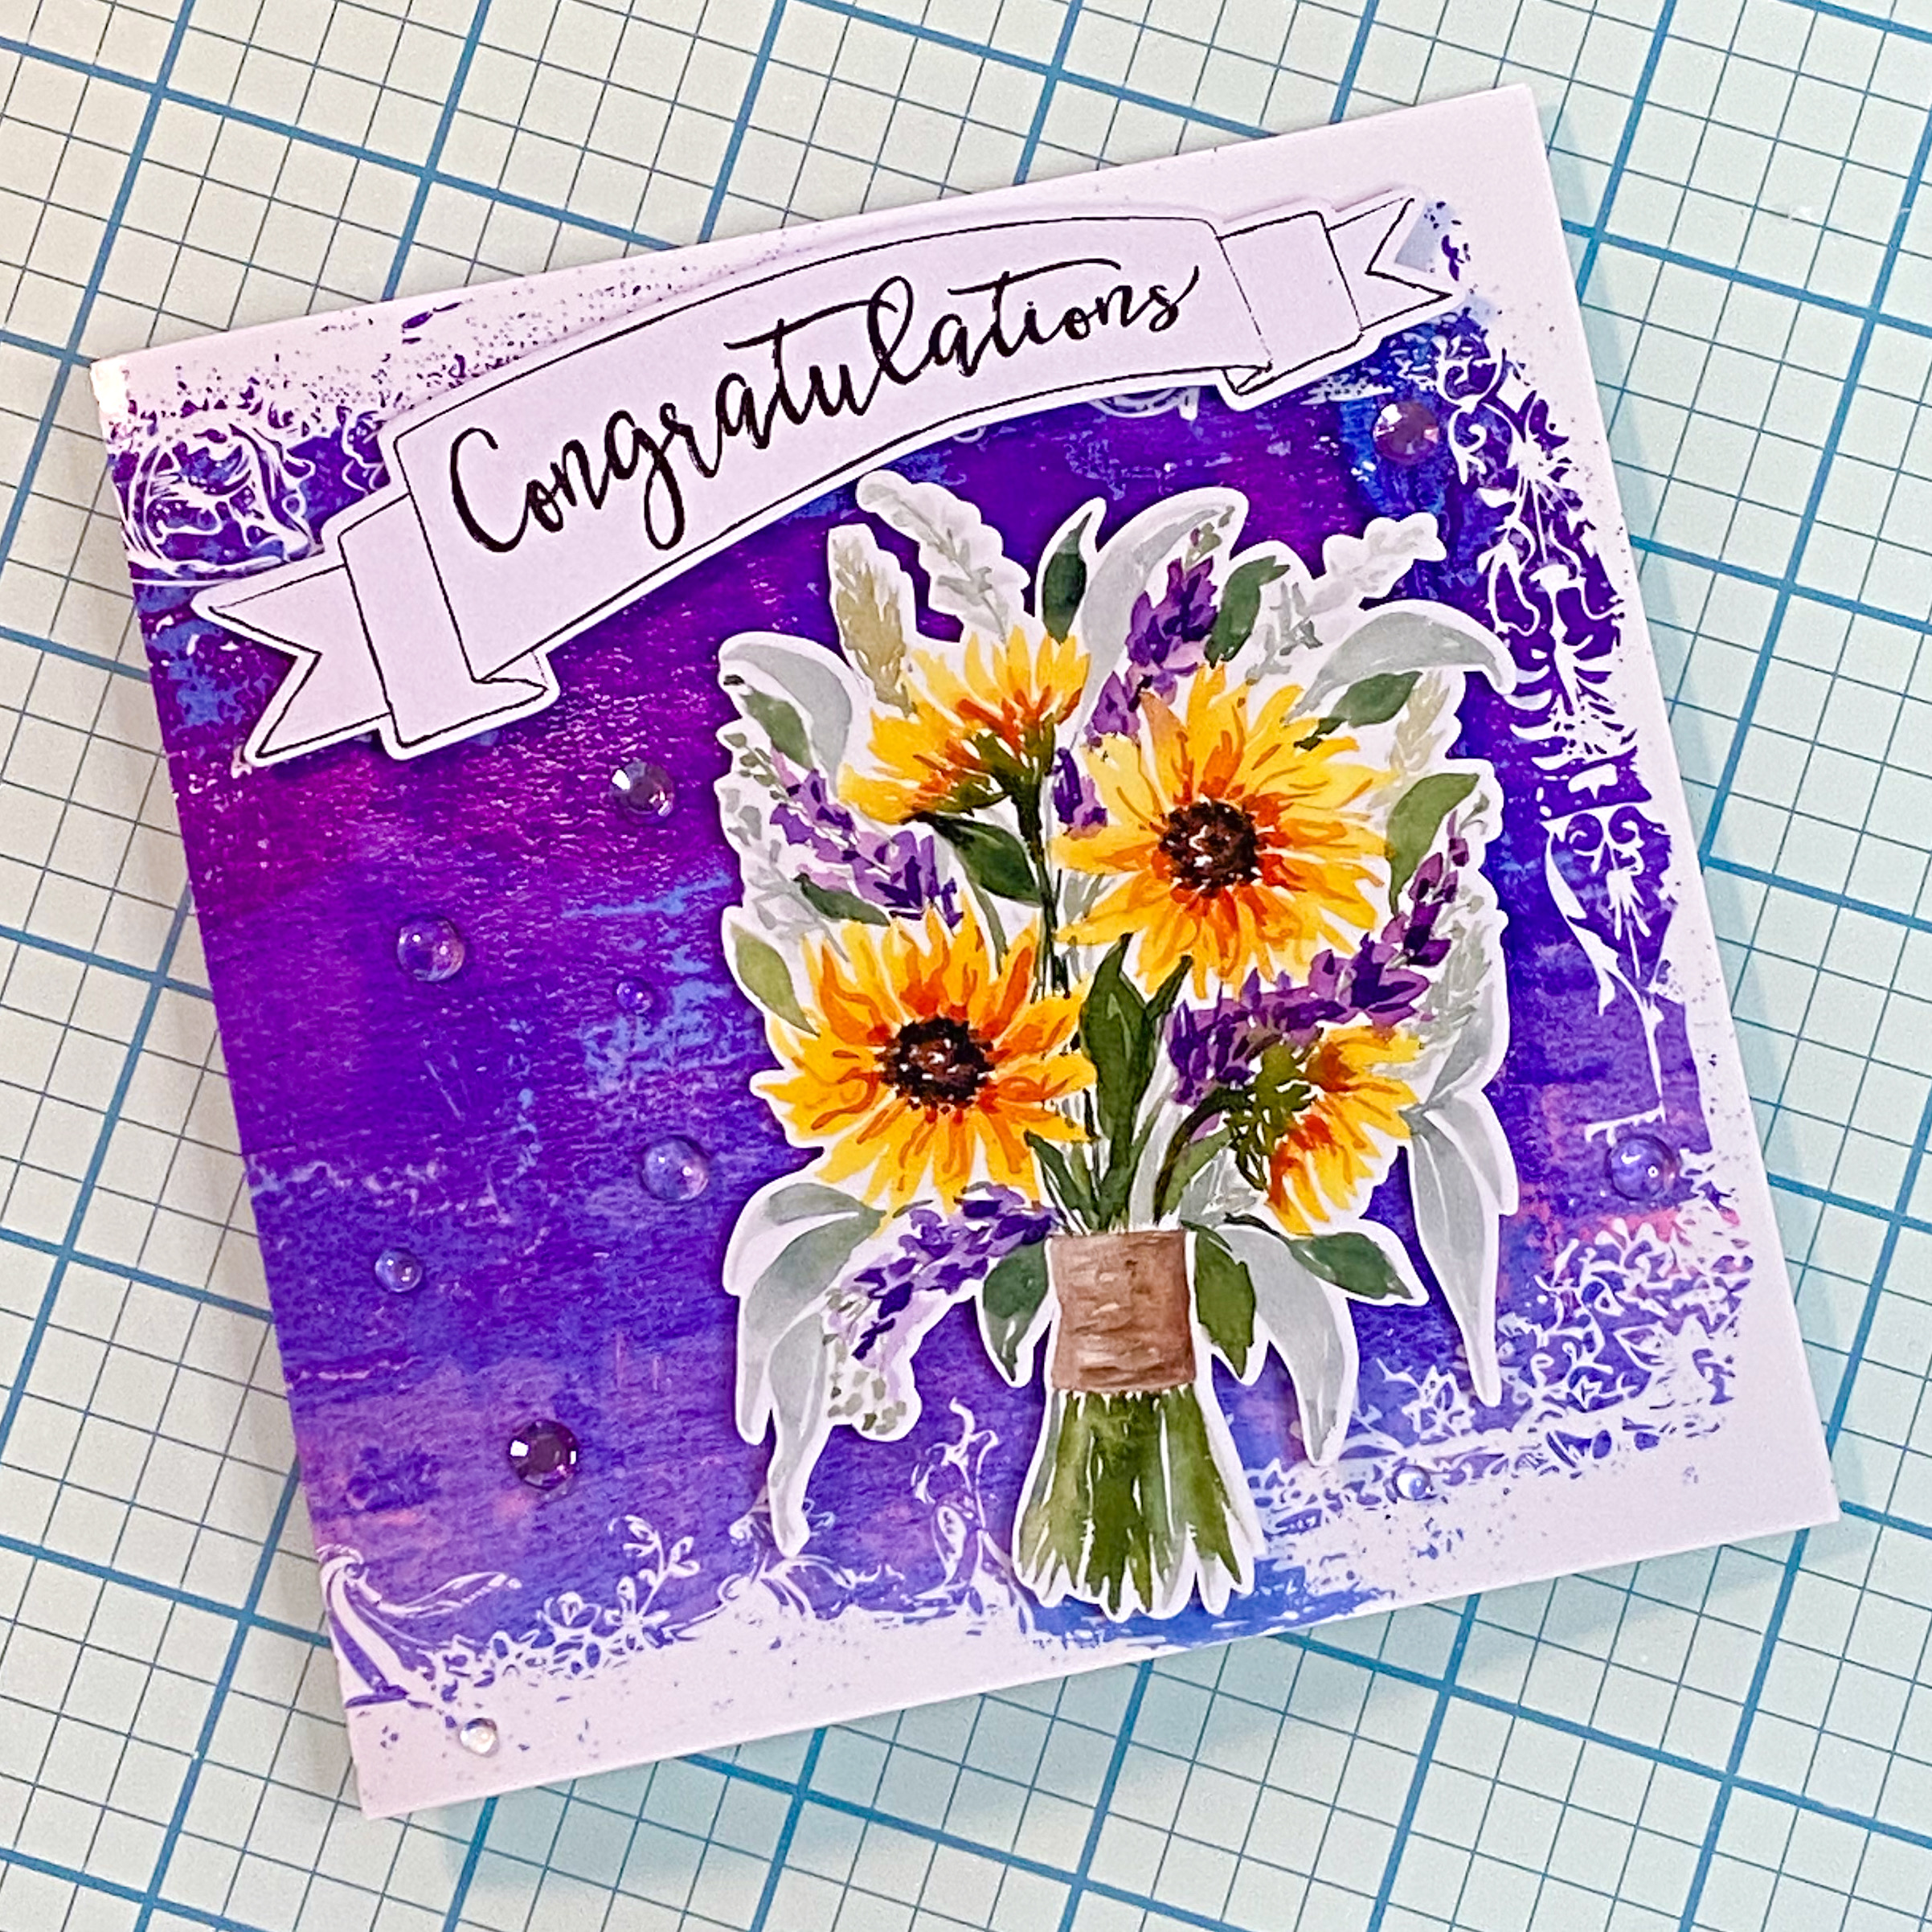
Aren’t sunflowers such a warm and friendly flower? I love them and I chose a gorgeous Sunflower Watercolour Bouquet Print and Cut design as the feature for this card. I adhered the sentiment banner and bouquet with adhesive foam squares and added some adhesive rhinestones and dew drop beads to finish off the card.
For the recipient of this card I knew her favourite colour was purple, and that she also likes pink so I thought it would be a lovely background which would also coordinate well with the bouquet feature.
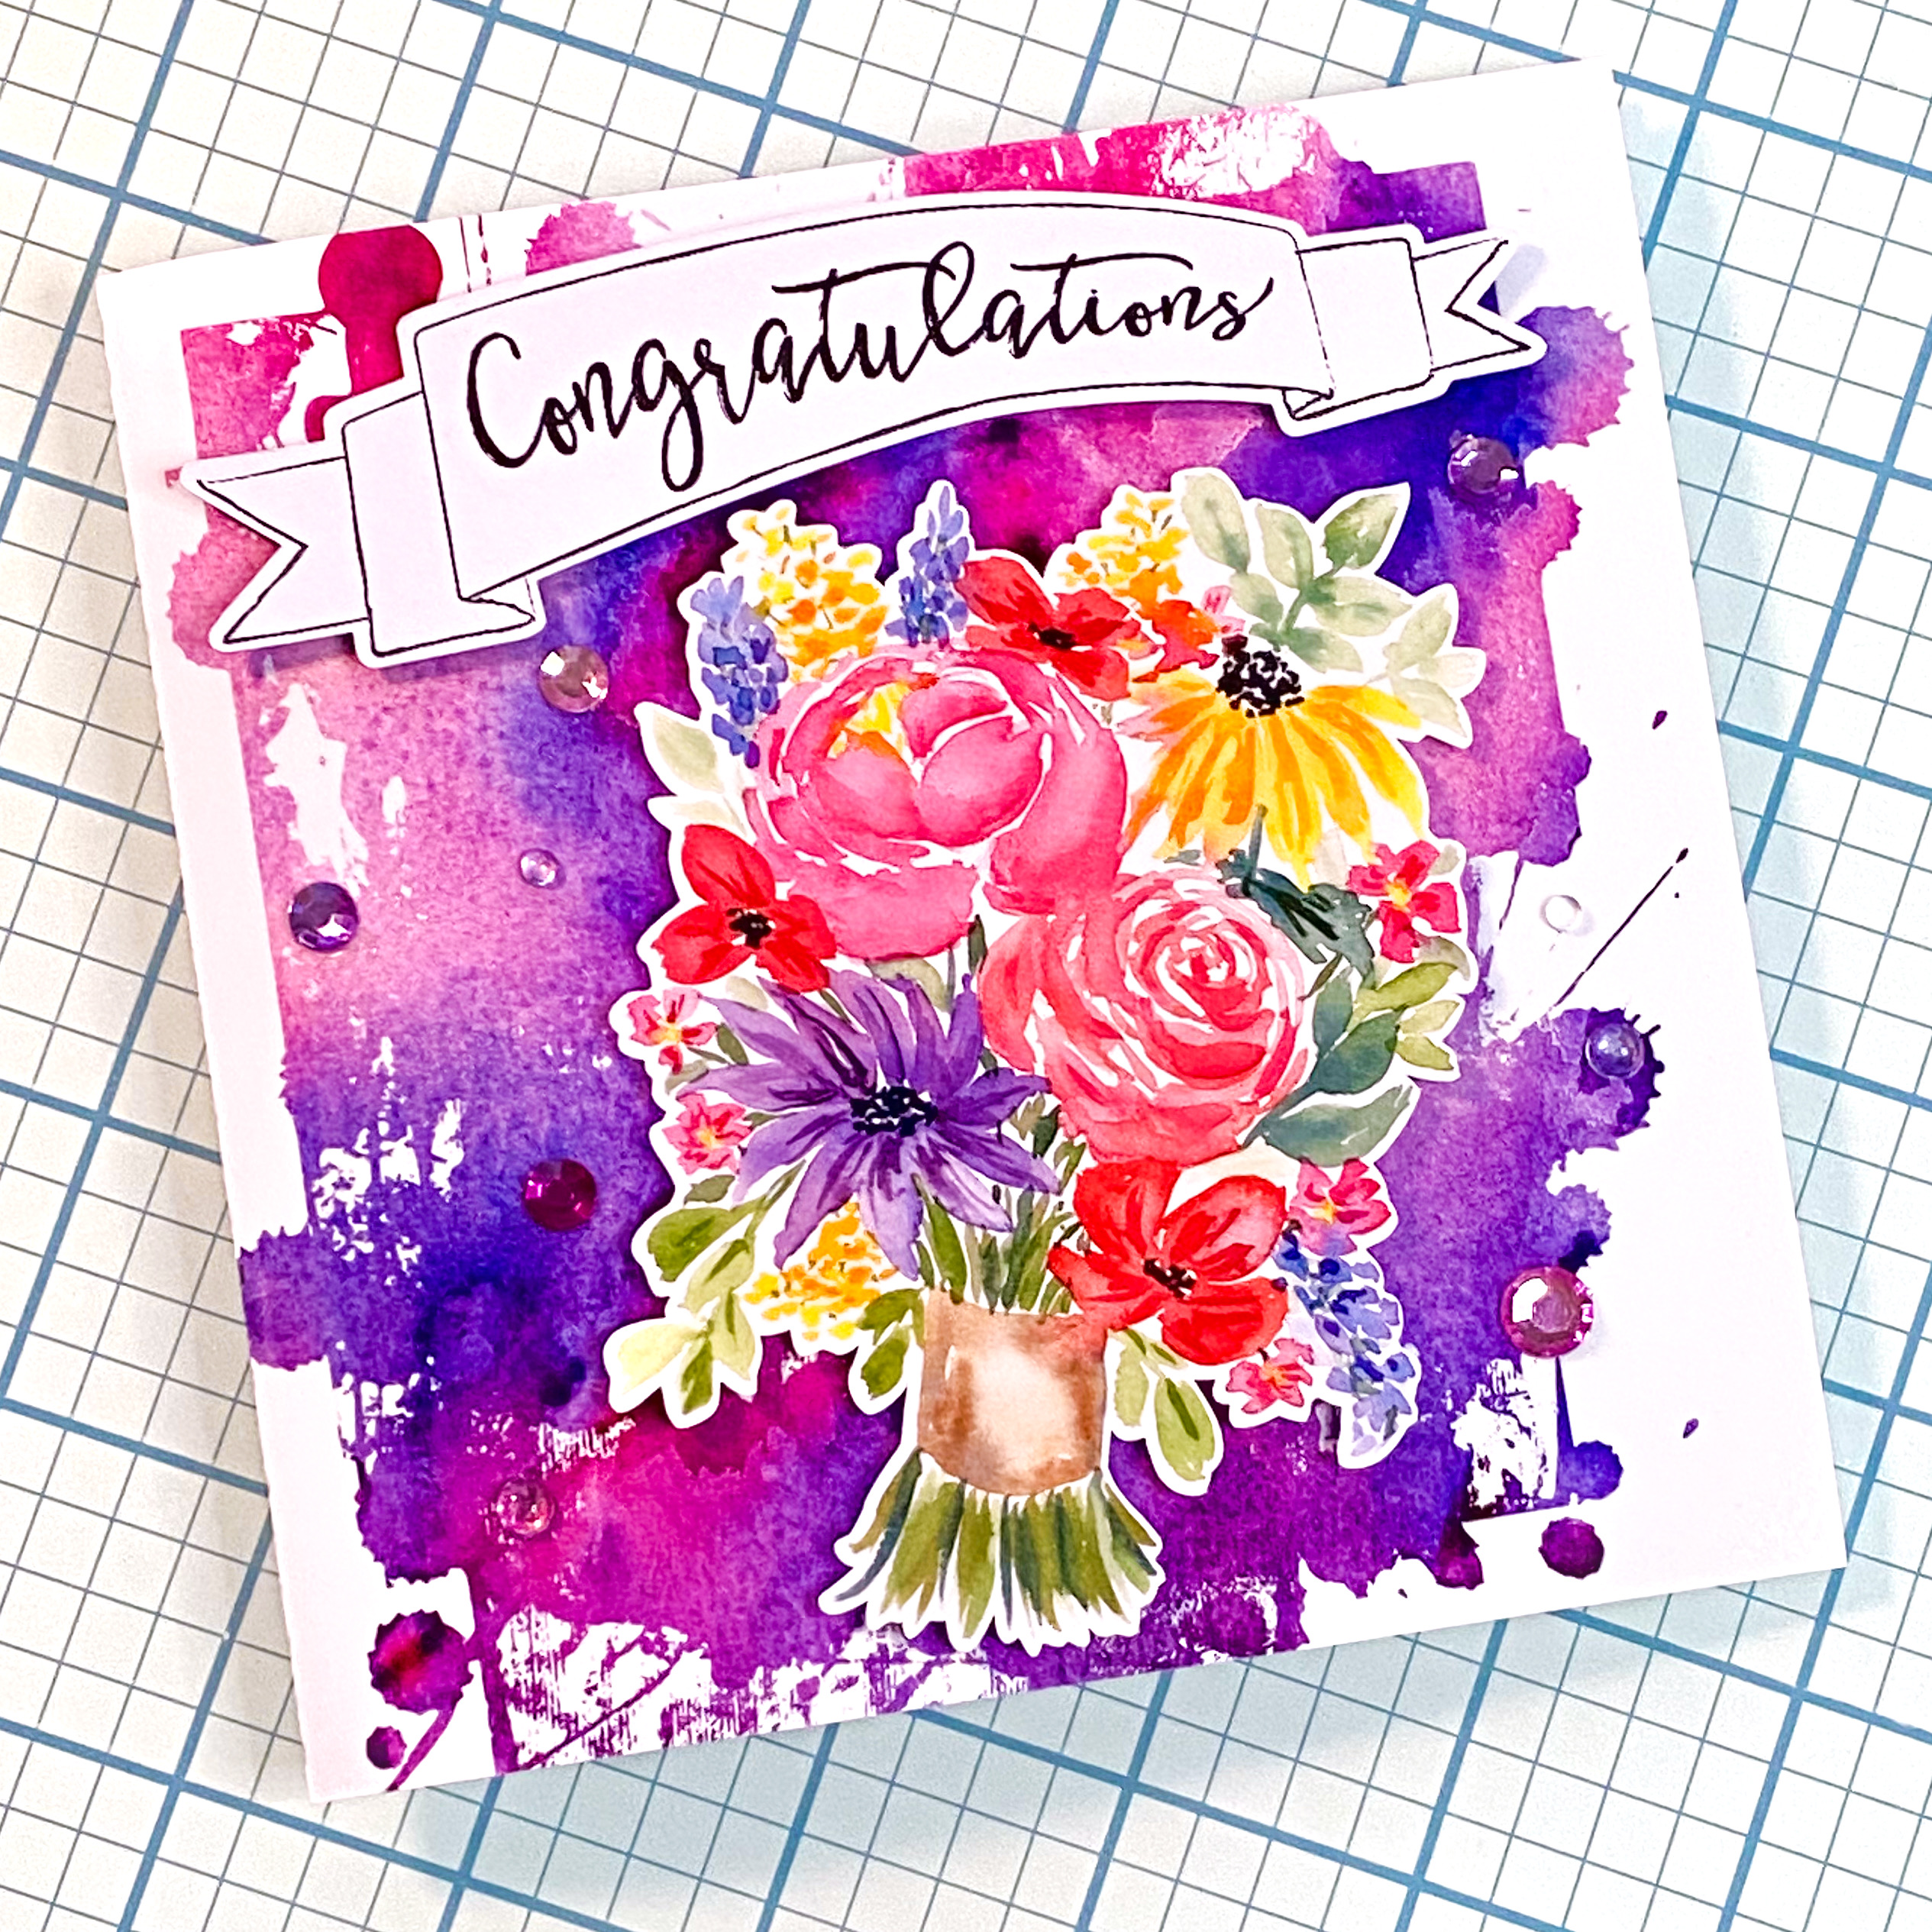
I used the Spring Mothers Day Watercolor Flower Bouquet Print and Cut for this card, and as you can see it works for much more than just Mothers Day. I just happened to paint this bouquet around Mothers Day and thought it would work beautifully for Mothers Day Cards!
Once I printed and cut the card base I adhered the sentiment banner and bouquet with adhesive foam squares and added some rhinestone bling and dew drop beads to finish it off!
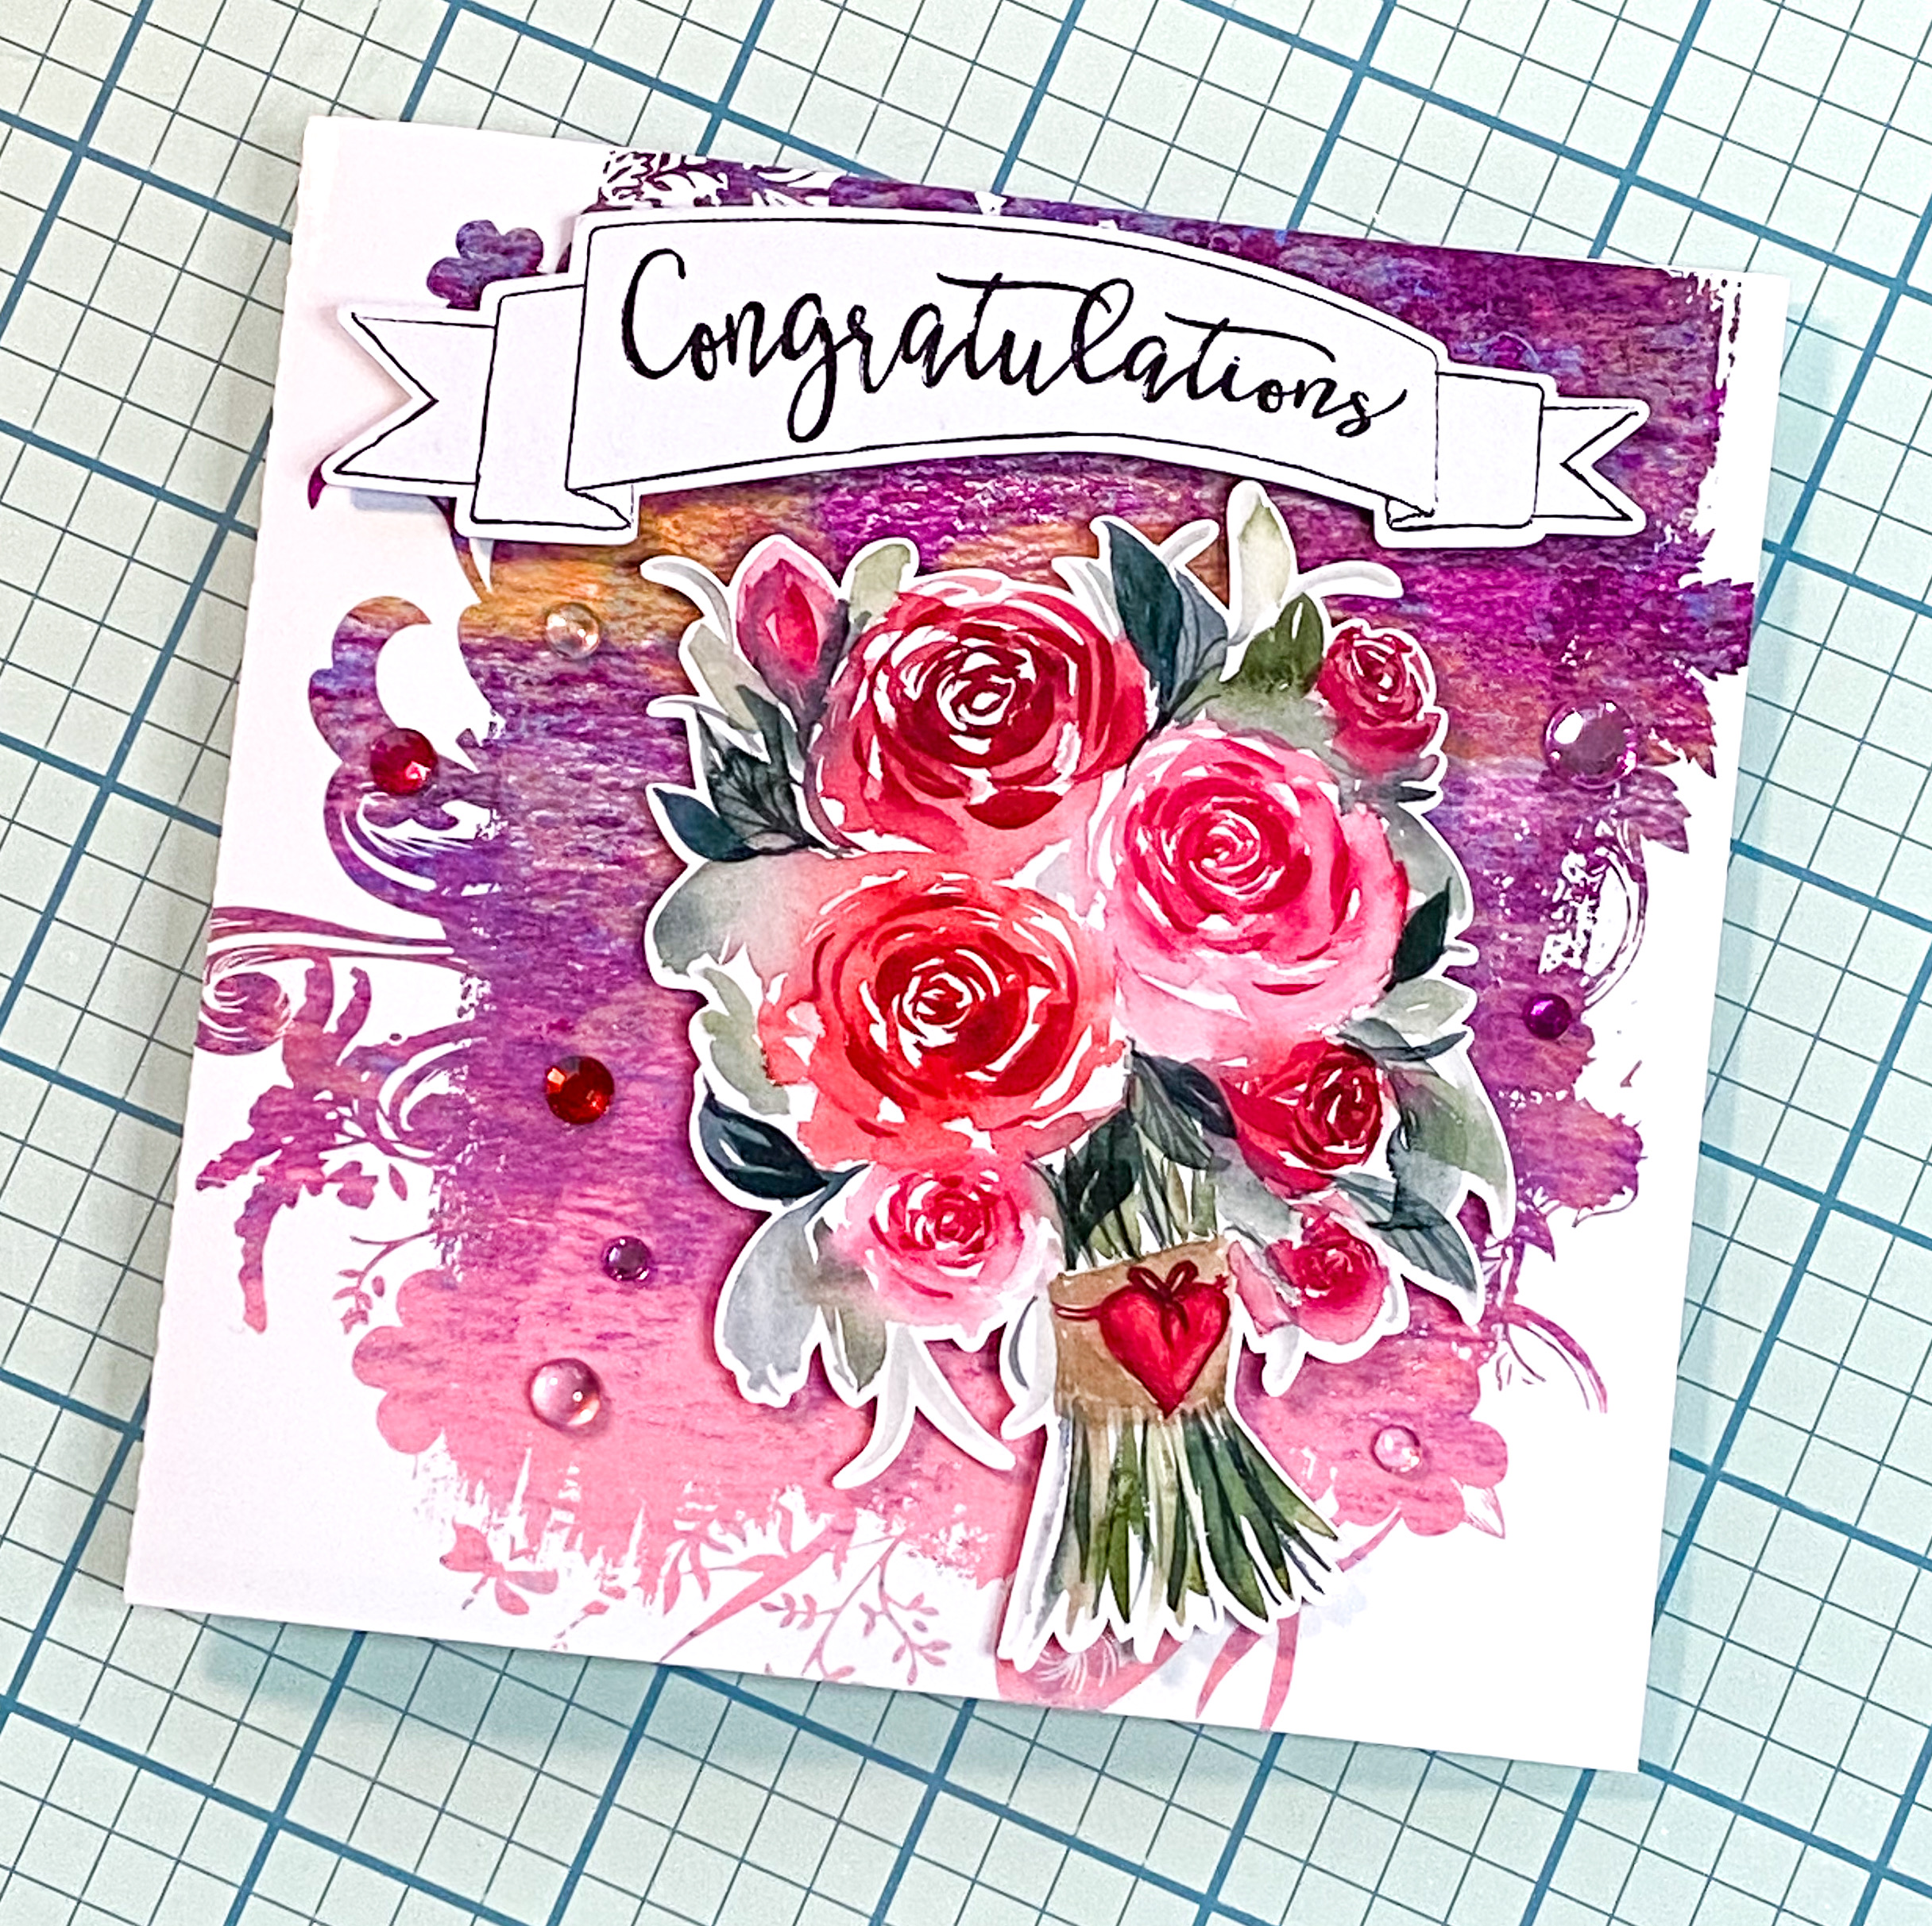
I just love the combination of the Red and Pink Roses with the Violet and Pink grungy background on this card. I find the combination beautifully striking and vibrant.
Once I adhered the sentiment banner and bouquet with adhesive foam squares and added some adhesive rhinestones and dew drop beads to finish this beautiful card.
If you haven’t already done so don’t forget the grab the card base template freebie from this article! It isn’t a complex design but it is ready to go!